How to Crochet "Cataleya's Gum Drop" Messy Bun Beanie
- Karen Edwards
- Nov 21, 2020
- 6 min read
I love this new design and I am sure you will too! This is not your typical hat that is worked from the bottom up or the top down! Uniquely it is worked sideways! I know I've got your attention now and you are curious as to how this works but I'll explain it more in the pattern instructions!
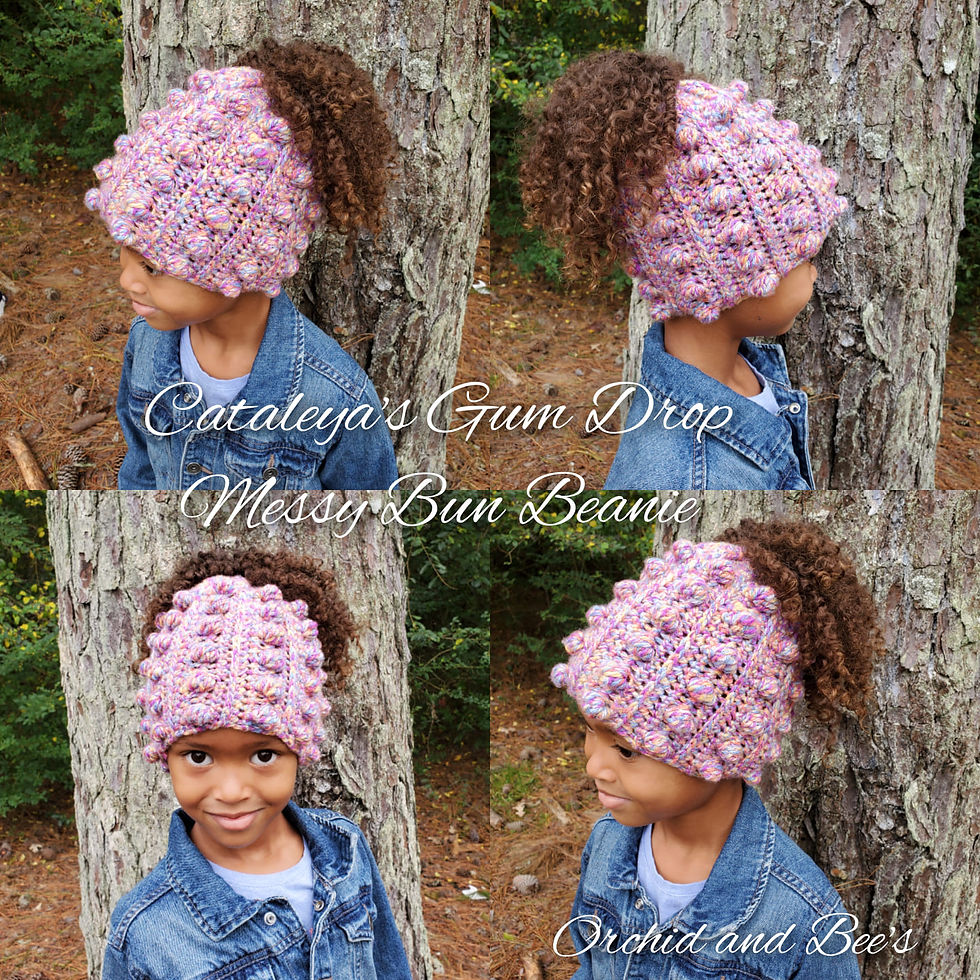
So how did I come up with this design? I'll admit I was in a little bit of a creative slump after a close friend passed away and my 5 yr old, Cataleya, asked me to make her a new hat while we were walking around a craft store. She found this yarn called Lollipop Love by "I Love this Yarn" and that's all it took for me to get my crojo back!
After playing with a few different stitches we decided on these vertical bobbles and she said they looked like candy! With Christmas around the corner, it was only fitting to call it "Cataleya's Gum Drop Messy Bun Beanie!"
If you find yourself needing a pdf copy of this pattern that you can download and print you can visit my Etsy or Ravelry Shop to purchase a file that you can keep forever!
So I know you are super excited about trying this hat out so let me go ahead and get you the instructions!
Cataleya’s Messy Bun Gum Drop Hat”
Crochet Pattern
Materials:
Yarn - worsted weight 4 - “I Love This Yarn - Lollipop Love” - Approx 130 yards / 2.6oz for the child size seen in picture
Hook - H 5.0mm
Needle
Scissors
Hair Tie / Ponytail Holder/ Hair Elastic - I used the Scunci brand from Walmart & Target like in the picture below

Stitches:
Ch(s) - chain(s)
Sc - single crochet
Sl st - slip stitch
Sp(s) - space(s)
Slst2tog - slip stitch two stitches together
Hdc - half double crochet
BO - Bobble
CSFS - Camel Stitch Front Side
* * - repeat *to*
#st - complete # of sts in same space
St # - complete stitch in next number of spaces
Special Stitches:
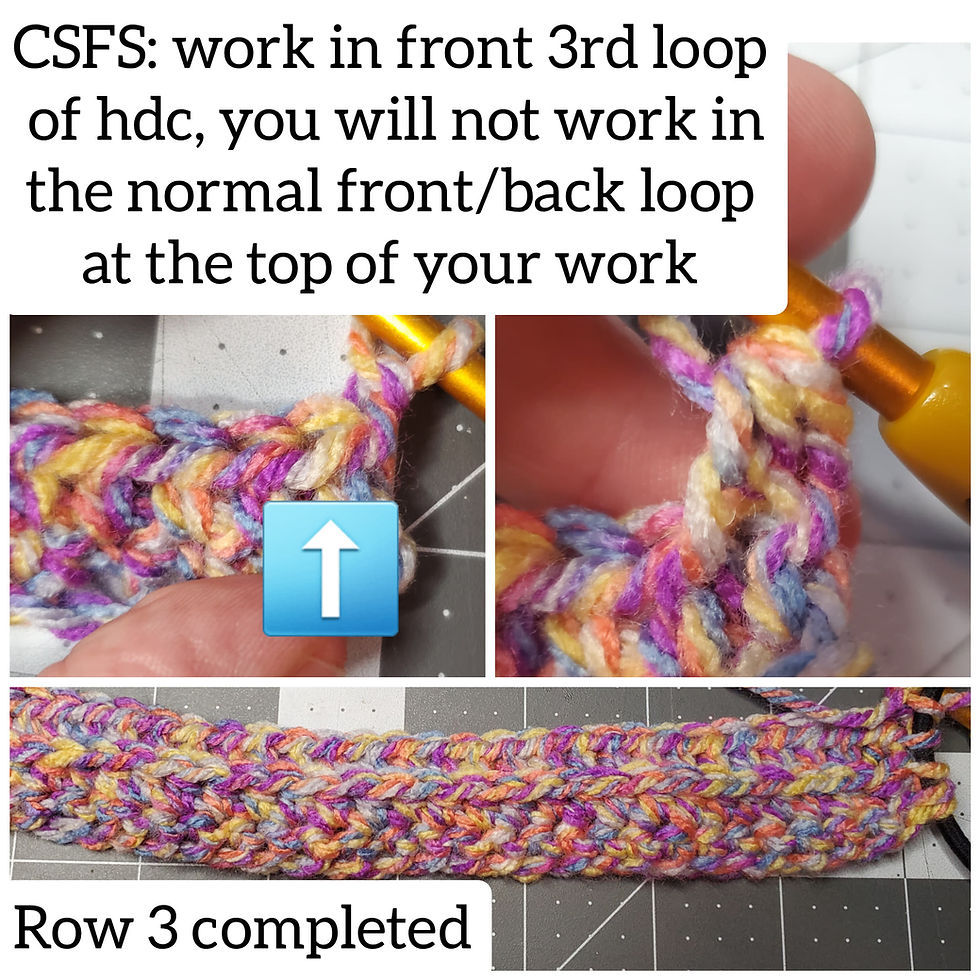
Camel Stitch Front Side - for this pattern,work a half double crochet stitch into the 3rd loop on the front side of your work. You will not be using the traditional front or back loop at the top of your work. See 4th photo in the right column next to the pattern instructions.
Bobble Stitch (BO)- for this pattern, you will join 6 double crochets into 1 puffy looking stitch. The sc stitches which surround it, will make it pop out more. To achieve the Bobble Stitch, you will *yarn over, go through st, yarn over and pull through 2 loops*, do not finish st, repeat 5 more times, you will have 7 loops (6 half finished double crochet stitches) on your hook, yarn over and pull through all 7 loops, do not chain to close the cluster, immediately start the next st in the pattern. For more info on this stitch see the photo tutorial and Yarnspirations definition.

Skill Level / Language - Beginner/Intermediate. If you are unsure of any stitches Youtube will be your best friend! There are great tutorials on the different stitches and on crocheting in rounds. American Standard Terms are used.
Gauge:
This hat is worked vertically instead of horizontally, your chain will equal the height of the hat (top to bottom) and the rows will equal your width
Multiples of 4 + 1
8 rows = approx. 3 inches
You can test your size out by doing the first 8 rows as written in the instructions to get your gauge and then make adjustments as necessary.
Yarn brand, crochet technique, tension, etc will affect your hat size. You can either change hook sizes or just make adjustments to the math according to your measurements
Because of the way the hat gathers around the hair tie I added an extra inch in my length. When flat without being sewn closed it is 8 inches, but once sewn closed it is about 7 inches.
Sizing:
Continued in the next column are the beanie/hat size estimations, you can also measure your head or the persons head whom you are making the hat for
Estimates are in inches
I recommend adding an extra inch than needed because once the hat is sewn closed and rounded at the top you lose about an inch
Age & Size: Hat Circumference / Hat Length
Newborn: 12 / 5
0-6 months: 14 / 5.5
Toddler (1-3yr): 16 / 6.5
Child (3-10yrs): 18 / 7
Teen/Small Adult: 20 / 8
Medium Adult: 21 / 8.5
Large Adult: 22 / 9
XLarge Adult: 23 / 9.5
2XL Adult: 24 / 10
Pattern Info
Her hat is what is shown in the photo at the beginning of this post and it is approximately 7 inches in height and between 15 - 16 inches in diameter.
The pattern instructions are written exactly to how I made her hat but you can easily add more length by increasing the chain in multiples of 4 and then adding one extra chain at the end. You can repeat rows 5 - 8 as many times as desired to get the width that you like. You can also stop on any row that you desire and sew up the seam.
If you reach the end of your pattern and you need a little more length you can easily add a brim by joining your yarn and adding a few rows of single crochet stitches or stitch of your choice.
This hat is fun, easy and quick! I was able to do it in one sitting and once you get the rhythm you will fly through this pattern as well!
Pattern Tester Margie Leverette did the Adult Women's Size L and below is a photo collage of how hers turned out for her adult daughter

Pattern Instructions
*Beginning chains do not count as st
*Even rows are the right side, odd rows are the wrong side
Hat:
Begin: Join yarn around hair tie, ch 29.
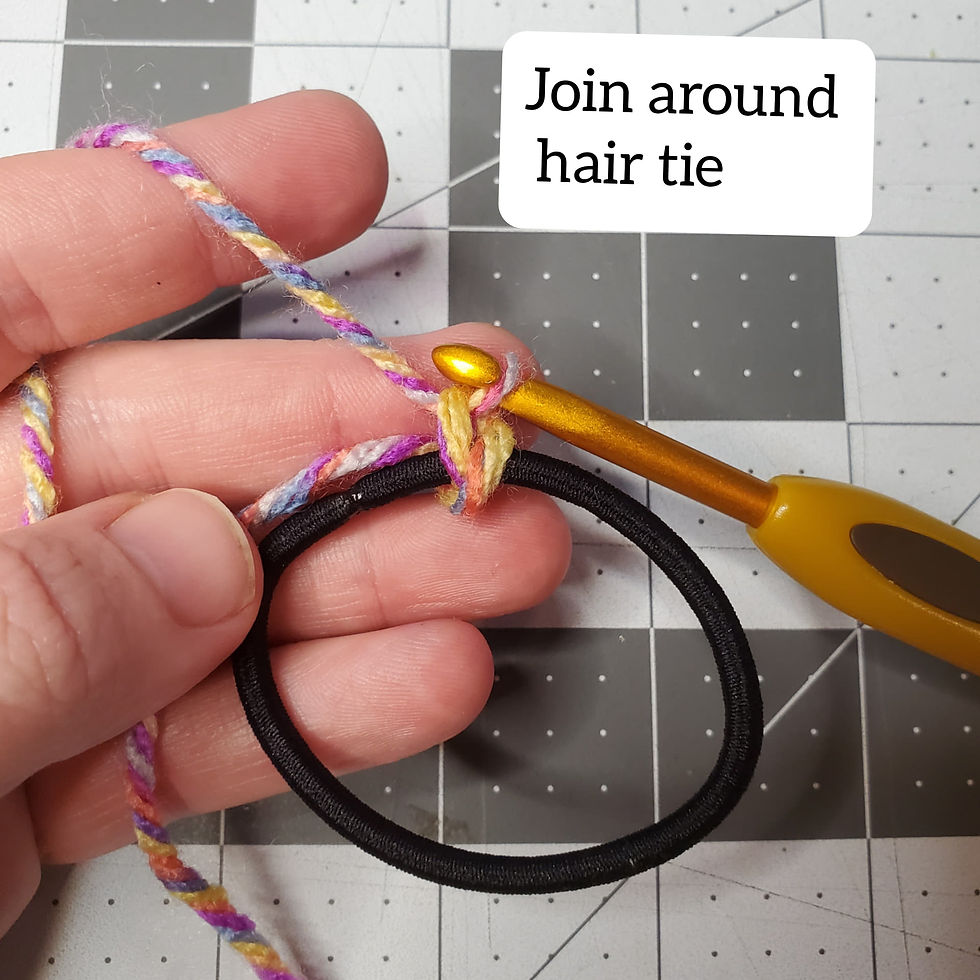
Row 1: Turn, sc in 2nd ch from hook, sc next 27, sl st around hair tie, ch 1. (29st)

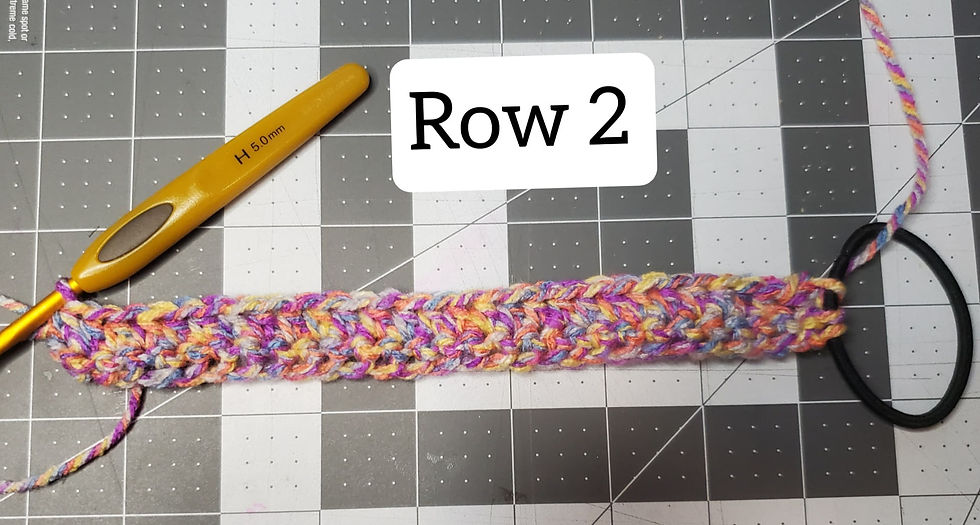
Row 2: Turn, slst2tog, hdc 27, ch 1. (28st)
Row 3: Turn, CSFS 27, hdc in back loop of slst, sl st around hair tie, ch 1. (29st) *see special stitch info
Row 4: Turn, slst2tog, sc 4, BO, *sc 3, BO* repeat *to* to end, sc in last two stitches, ch 1. (28st) *see special stitch info
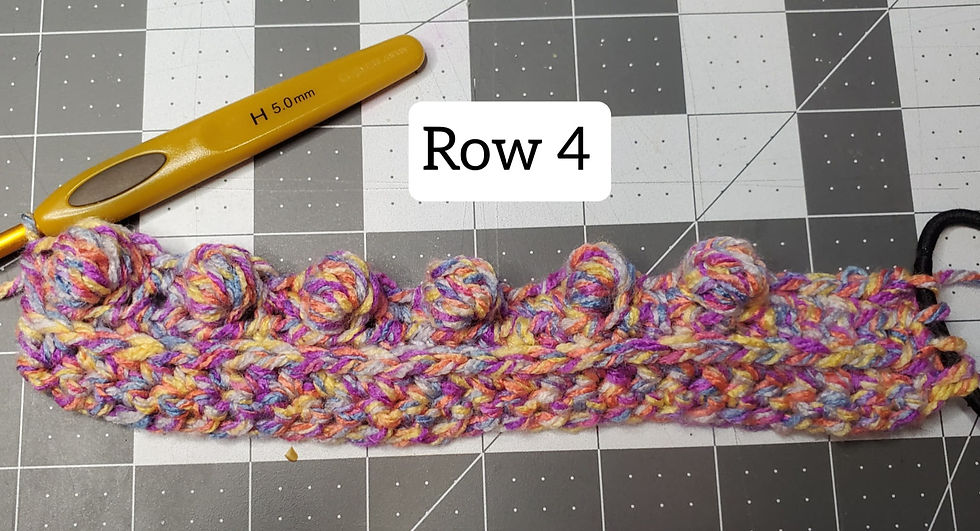
Row 5: Turn, sc 28, sl st around hair tie, ch 1. (29st)
Row 6: Turn, slst2tog, hdc 27, ch 1. (28st)
Row 7: Turn, CSFS 27, hdc in back loop of slst, sl st around hair tie, ch 1. (29st) *see special stitch info for assistance and 4th picture on the right.
Row 8: Turn, slst2tog, sc 4, BO, *sc 3, BO* repeat *to* to end, sc in last two stitches, ch 1. (28st)
Rows 9 - 40: Repeat rows 5 - 8. After the last sl st of row 40, fasten off and leave a long tail. *Or repeat as many times to desired width and then finish with row 41.
Row 41: Sc 28, sl st around hair tie and proceed to the finishing step to close up hat.
Finish: Flip hat inside out and match up the stitches. You can either join the sides together with a needle and the tail or sl st the seam. See photos on the next page for assistance.
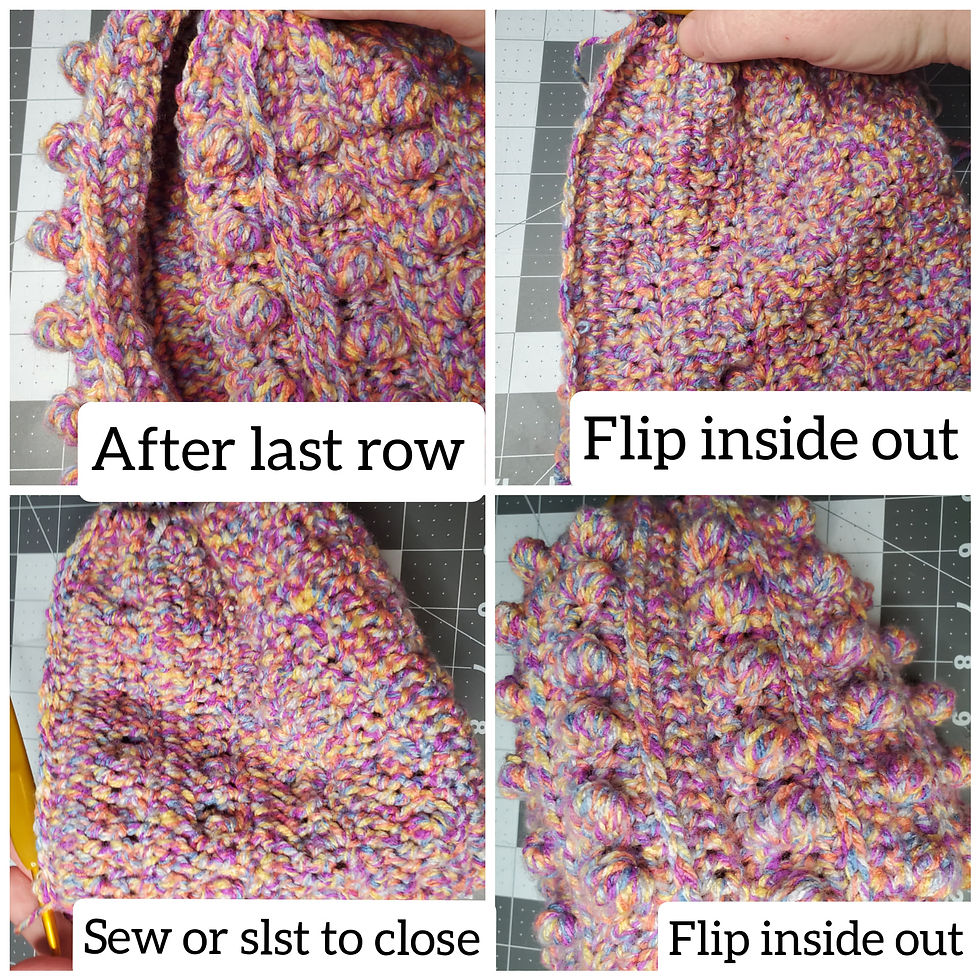
And there you have it! You have successfully created your messy bun beanie! You will have something that looks similar to what you see below! You can now wear it with a ponytail or messy bun!


Thank you for trying this pattern! I hope you enjoyed it as much as I did! I also hope you love this hat as much as my 5 yr old! She wants to wear it even on days where it's too hot ha ha! The first night I made it she wanted to wear it to bed lol! She is a hoot!
I would love to see photos of your finished work from his pattern! Please feel free to share them in the Orchid and Bee's VIP Facebook Group !
You can also use the comment section of this post to share your creations and share your stories of who you blessed with this creation! I absolutely love hearing all your stories!
To subscribe to the blog you can do so by visiting the Home page and clicking the Subscribe button so you never miss out on any Free patterns! I will also make shop announcements via the blog and a quarterly newsletter as well!
Thank you again for visiting Orchid and Bee's and I appreciate you so much! I look forward to seeing you next time for another great free pattern!
Don't forget that if you would like a downloadable pdf ad-free pattern that you can print off you can grab this pattern from my Etsy or Ravelry Shop!
Well, that is all for now! I pray this brings a little joy to your 2020 Fall and Winter Season! I know it has been a tough year but keep your heads up and stay positive! Love you all! Thanks again for stopping by!
You guys have a wonderful day! Take care, stay safe, and be well!
Blessings to each of you,
Karen E.

Comments