
Today I am going to share with you an amazing springtime crochet applique! Willow the Deer has such a sweet spirit about her and is fun and easy to work up! She is perfect for blankets, bags, pillows, and even as wall decor!

Normally in my post I spend a little more time chatting with you, however, right now in our nation there is an illness called Corona (COVID 19) attacking people accross the country (and in other countries globally as well) and in my city, there is a shelter in place ordinance in place. This, in short, basically means no one can leave their homes and all non-essential businesses are closed.
Because of this unique situation, only essential workers can work and I am one of those essential workers who is helping seniors, shut in's, and families with small children have access to food which makes my time for my crochet business very limited.
So for today, I am just going to get straight to the point and tell you how to crochet willow the deer! Please share your photos with the Orchid and Bee's family VIP Group! One of my moderators, Vannessa Sturm, in the group is running a contest for members to share photos of completed Orchid and Bee's patterns. Winners and participants both get prizes! Yippee!
Please note for the sake of time I will be simply copying and pasting my pattern into the blog before I leave for work, unfortunately I do not have much time to comb through it and change page number references and other notes that only apply to the PDF hardcopy. For the time being, I just want to get this pattern to you so it will have to do for right now, so you will have to overlook those little notes! :)
When I have another free moment I will come back and edit but for the time being here is the pattern! Please enjoy! If you have any questions my testers in the Orchid and Bee's VIP group will be happy to help you! Thanks for your patience and understanding!
“Willow The Baby Deer”
Crochet Pattern
Material:
Worsted Weight #4 (White, Tan, Cream, Pink, Black)
Embroidery Thread *(Black, White)*optional
Hook - G or 4mm & E or 3.5mm
Needle
Scissors
Hot glue or Fabric Glue *optional
Safety eyes: 6mm or size of choice
Stitches:
Ch(s) - chain(s)
Sc - single crochet
Sl st - slip stitch
Dc - double crochet
Tr - treble/triple crochet
Sp(s) - space(s)
Sk - skip
St(s) - stitch(es)
Hdc2tog - hdc two stitches together
#st - complete # number of sts in same space
St # - complete stitch in next # number of spaces
( ) - do all in the same stitch/space
Skill Level / Language - Beginner. If you are unsure of any stitches, Youtube is a great resource! American Standard Terms are used throughout the pattern.
Pattern Info - This pattern is quick and easy! You can use your baby deer applique on blankets, pillows, backpacks, diaper bags, and more! Willow is approximately 7.5 inches wide and 10 inches tall. This will vary based on how you choose to assemble her.
Thank you - I appreciate your business and your support means so much to me! If you need anything, please reach out to me and I will be happy to help! You can find “Orchid & Bee’s” on Facebook! Be sure to join the VIP group for early access to patterns and even get free exclusive patterns!
Pattern Instructions
*beginning chains do not count as a st unless otherwise noted
*begin each st in the same space as the beginning chain on rounds
*leave long tail for sewing or weave in ends if gluing
*use G hook for all parts except the Micro Heart Nose and Spots 1, 2 and 3
Inner Face: Cream or White
Begin: MR, ch 1.
Round 1: Hdc 10 in MR, pull tight to close, sl st to join, ch 2. (10st)
Round 2: *2dc, 2dc, 2hdc in next 3 sts* repeat * to*, sl st to join, ch 2. (20st)
Round 3: Dc, 2dc, dc, 2dc, *hdc, 2hdc*, repeat *to* 2 more times, dc, 2dc, dc, 2dc, *hdc, 2hdc*, repeat *to* 2 more times, sl st to join, ch 2. (30st)
Round 4: *Dc 2, 2dc*, repeat *to* 1 more time, *hdc 2, 2hdc*, repeat *to* 2 more times, *dc 2, 2dc*, repeat *to* 1 more time, *hdc 2, 2hdc*, repeat *to* 2 more times, sl st to join, fasten off. (40st)
Forehead: Tan
Begin: Ch 3
Row 1: Sc in 2nd ch from hook, sc, ch 1. (2st)
Row 2 & 3: Turn, Sc 2, ch 1. (2st)
Row 4: Turn, (sc, hdc), (hdc, sc), ch 1. (4st)
Row 5: Turn, (sc, hdc) , hdc 2, (hdc, sc), ch 1. (6st)
Row 6: Turn, (sc, hdc), hdc 4, (hdc, sc), ch 1. (8st)
Row 7: Turn, (sc, hdc), hdc 6, (hdc, sc), ch 1. (10st)
Row 8: Turn, (sc, hdc), hdc 8, (hdc, sc), ch 1. (12st)
Row 9: Turn, (sc, hdc), hdc 10, (hdc, sc), fasten off. (14st)
Micro Heart Nose: Pink - E 3.5mm hook
Begin: MR, ch 1.
Round 1: All in MR (Sl st, sc, hdc, ch 2, sl st, ch 2, hdc, sc, sl st, ch 1), pull tight to close, sl st to join to 1st sl st of round. (6 st)
Ears: Tan - make 2
Begin: Ch 11
Round 1: Sc in 2nd ch from hook, hdc, dc 2, 2tr in next 2sts, dc 2, hdc, sc, continue around to unworked side of beginning ch, sk, sc in next st ch sp, hdc, dc, 2tr, dc, sc 2, sl st 2, fasten off. (22st) *see diagram below for assistance

Main Body: Tan
Begin: Ch 6
Row 1: Hdc in 2nd ch from hook, hdc next 4, ch 1. (5st)
Row 2: Turn, hdc 5, ch 1. (5st)
Row 3: Turn, 2hdc, hdc 3, 2hdc, ch 1. (7st)
Row 4: Turn, hdc 7, neck section complete, ch 15. (7st, 15chs).
Row 5: Beginning chest and back sections, turn, hdc in 2nd ch from the hook, hdc next 13, hdc 7 across neck section, ch 1. (21st)
Row 6: Turn, 2hdc, hdc 19, (hdc, sc), ch 1. (23st)
Row 7: Turn, (sc, hdc), hdc 22, ch 1. (24st)
Row 8 - 10: Turn, hdc 24, ch 1. (24st)
Row 11: Hdc2tog, hdc 21, sl st, ch 1. (23st)
Row 12: Turn, sl st, sc, hdc 20, sl st, fasten off. (23st)
Legs: Tan - make 2 or 4
Begin: Ch 6
Row 1: Hdc in 2nd ch from hook, hdc next 4, ch 1. (5st)
Row 2: Turn, hdc 5, ch 1. (5st)
Row 3: Turn, hdc2tog, hdc, hdc2tog, ch 1. (3st)
Row 4 - 7: Turn, hdc 3, ch 1. (3st)
Row 8: Turn, hdc 3, fasten off. (3st)
Hoof Accents *optional: Black - make for each leg
Begin: Ch 6
Row 1: Sl st in 2nd ch from hook, sl st in next 4, fasten off. (5st)
Tail: White & Tan
Begin: White - Ch 7
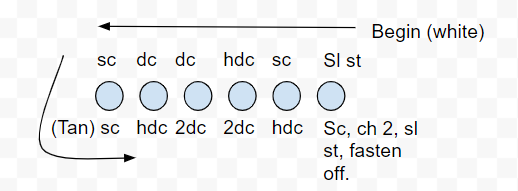
Round 1: Sl st in 2nd ch from hook, sc, hdc, dc 2, sc, change colors to tan before finishing st, sc in same space, continuing around unworked side of chain, hdc in next ch sp, 2dc, 2dc, hdc, sc, ch 2, sl st in same space, fasten off. (14st, 2ch) *see diagram below for assistance.
Spots:
Note: Here are 2 Spot option/alternatives to the ones I have instructions for in this pattern if you do not want to crochet them - Embroider the spots with white embroidery thread or yarn.
OR
You can use french knots. Photos and option ideas with yarn provided by Pattern Tester Cindy Hanlon.


Spot 1: White - E 3.5mm hook
Begin: MR, ch 1.
Round 1: Sl st, sc, hdc, sl st, sc, all in MR, pull tight to close, sl st to join, fasten off. (5st)
Spot 2: White - E 3.5mm hook
Begin: MR, ch 1.
Round 1: 3 sc in MR, pull tight to close, do not sl st to join, fasten off, tie the two tails in a knot. (3st)
Spot 3: White - E 3.5mm hook
Begin: MR, ch 1.
Round 1: Sl st, ch 1, sc, sl st, ch 1, sc, all in MR, pull tight to close, sl st to join, fasten off. (4st)
Eyes Option: Black - E 3.5mm hook
If you do not want to use safety eyes you can crochet them.
Begin: MR, ch 1.
Round 1: Sc 3 in MR, pull tight to close, sl st to join, fasten off. (3st)
Assembly
Note: I assemble my appliques with hot glue which is a fast and safe method. The glue adheres to the fibers quite well and the applique is very secure. The hot glue packaging that I use says non-toxic so it is safe in my opinion. In addition, you can machine wash on cold, and lay flat to dry or tumble dry/lowest heat setting. You may also use other fabric safe glue or use the traditional method of sewing your pieces together.
How I assemble my Deer:
I lay out all my pieces to get the look I want first. You can use pins to hold it together if you desire and/or take a picture of your layout with your phone to reference as you are putting it together.
You can pose the deer in a variety of ways to get different looks. (i.e. change the position of her legs to make her look like she is leaping or dancing, flip the body the other direction, tilt the head differently, etc. Have fun!
First I assembled my head by lining the top of the forehead up with the top of the main head section. Then I attached the micro heart nose and last I placed my eyes.
Eyelashes are optional if you would like to add them do not attach the backs to your safety eyes right away. Leave the safety eyes loose so that you can take a needle and embroidery thread and make three small stitches to the sides to make it look like eyelashes.
Once you have your eyelashes where you want them to be then you can put your safety eye backings on.
Note - for extra security I add a glob of hot glue to the back of my safety eyes.
Last I attached my ears. I lined them up with the edges of the forehead section. Point your ears away from one another. Since both ears were made pointing the same direction you will simply flip one over and push it in to make it concave.

Next, I attached the head tilted to the left onto the body.
Then I attached the tail to the back end of the deer and then placed the spots. You can place your spots anywhere you desire. Feel free to add more spots if desired!
Last I attached all the hoof accents to the legs and then attached my legs to the back of the main body section.
Congratulations!
Your Baby Deer is complete! I hope you enjoyed her and I look forward to seeing your baby blanket photos and other projects that you use Willow on!
Thank you for visiting Orchid and Bee's and be sure to subscribe on the Home page by clicking the Subscribe button so you never miss out on any Free patterns!
Also feel free to join us in the Orchid and Bee's VIP Facebook Group for early notices of new patterns, exclusive free patterns, prizes, Crochet-a-longs and more! We have a lot of fun and you won't want to miss out!
Thanks again and I'll see you next time!
Blessings & Love,
Karen E.
Comentários